|
Finding the system file storage in AIR |
||||||||
When progamming an AIR application, you may want to make use of the applicationStorageDirectory available via the flash.filesystem package to store temporary files/folders. You can find where your system is storing these files by doing something like the following:
2trace(f.nativePath + ' is where my file is stored');
This will give you an absolute path to the local system file storage location. Handy for multi platform applications, as Pc and MAC based systems will use different default storage directories.
|
Opening a new window from a flex / AIR application |
||||||||
I was sure I had done this before, somewhere but I couldn't find the code anywhere. So I've knocked together a really quick and simple example.
I want to be able to open a new site in a pop up from an AIR application. To do this I need to use the 'urlRequest' function to create a url request. Then insert that into a 'navigateToURL' method, specifying that you want a new window '_new'.
Here is the complete example.
2<mx:Application xmlns:mx="http://www.adobe.com/2006/mxml" layout="absolute">
3
4<mx:Script>
5 <![CDATA[
6
7 public function goToUrl(link:String):void
8 {
9 var urlRequest:URLRequest = new URLRequest('http://' + link);
10 navigateToURL(urlRequest, "_new");
11 }
12
13 ]]>
14</mx:Script>
15
16 <mx:Canvas x="10" y="10" width="321" height="146" backgroundColor="#FFFFFF">
17 <mx:Form x="10" y="52">
18 <mx:FormItem label="URL">
19 <mx:TextInput id="urlTxt"/>
20 </mx:FormItem>
21 </mx:Form>
22 <mx:Button x="10" y="114" label="Go to" click="goToUrl(urlTxt.text)"/>
23 <mx:Label x="10" y="10" text="New Window test" />
24 </mx:Canvas>
25
26</mx:Application>
Works like this.
|
Adding custom Chrome to your AIR application |
||||||||
Whilst creating my last AIR application I found that the standard 'Chrome' that is provided by the OS just didn't match the application look and feel at all.
After a little searching I found that there are a few key elements in your application that you need to change to remove the standard operating system Chrome, and stop Flex builder from replacing it with its own.
Firstly in your application-app.xml document look for the 'systemChrome' xml value. Setting this to none will disable the operating system Chrome. As we are using the 'WindowedApplication' Flex builder will automatically start using its own Chrome framework, so we need to turn that off too.
2<systemChrome>none</systemChrome>
3
4<!-- Whether the window is transparent. Only applicable when systemChrome is none. Optional. Default false. -->
5<transparent>true</transparent>
This is done in the WindowedApplication code, set showFlexChrome="false" and that will disable Flex from using its default Chrome.
2<mx:WindowedApplication xmlns:mx="http://www.adobe.com/2006/mxml" layout="absolute" initialize="init()" showFlexChrome="false">
Now that we have completely turned it all off, we need to build our own. In this application I am using a canvas with rounded corners that is 15 pixels larger than the application canvas, to give the impression of a border all the way around. Inside that canvas I've added two controls.
2<mx:Label text="X" styleName="controls" toolTip="Close" x="184" y="1" click="onClose()" />
These simply replicate the functionality that the minimise and close buttons give a user on a standard window. The functions they call are:
2 {
3 stage.nativeWindow.minimize();
4 }
5
6 public function onClose():void
7 {
8 stage.nativeWindow.close();
9 }
And with that you fully customise the look and feel of your applications Chrome.
|
Flex Currency Formatter Example |
||||||||
Whilst developing a new Flex shopping cart I came across an issue in dealing with the formatting of currencies for the payment system. The previous version of the shopping cart had preformatted values stored in the actual database, so I was simply displaying them in the Flex front end.
In this version there is the specific requirement that it is able to handle a multi currency configuration. So I thought I'd dig out the documentation on the Flex currency Formatter.
Firstly create a CurrencyFormatter object, and specify the currency symbol, and any other formatting parameters that you require.
Next create a NumberValidator, as this will validate our entered value as a numeric value, we don't need to try and re-format alpha numeric values.
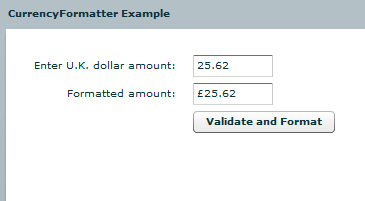
Then create a form to run the test validation against. I often find it easier to build a test mechanism at the same time. Below is a simple submission form, in the form we just enter the value, click the Button, which fires the Format() function.
2<!-- Simple example to demonstrate the CurrencyFormatter. -->
3<mx:Application xmlns:mx="http://www.adobe.com/2006/mxml" layout="absolute">
4
5 <mx:CurrencyFormatter id="ukFormatter" precision="2"
6 currencySymbol="�" decimalSeparatorFrom="."
7 decimalSeparatorTo="." useNegativeSign="true"
8 useThousandsSeparator="true" alignSymbol="left"/>
9
10 <mx:NumberValidator id="numVal" source="{priceUK}" property="text"
11 allowNegative="true" domain="real"/>
12
13 <mx:Panel title="CurrencyFormatter Example" width="75%" height="75%"
14 paddingTop="10" paddingLeft="10" paddingRight="10" paddingBottom="10">
15
16 <mx:Form>
17 <mx:FormItem label="Enter U.K. dollar amount:">
18 <mx:TextInput id="priceUK" text="" width="50%"/>
19 </mx:FormItem>
20
21 <mx:FormItem label="Formatted amount: ">
22 <mx:TextInput id="formattedUKPrice" text="" width="50%" editable="false"/>
23 </mx:FormItem>
24
25 <mx:FormItem>
26 <mx:Button label="Validate and Format" click="Format();"/>
27 </mx:FormItem>
28 </mx:Form>
29
30 </mx:Panel>
31
32</mx:Application>
The Format() function checks that the value is numeric, and applies the CurrencyFormatter object to the value. Then we simply assign the newly formatted value back to our Text field in the form.
2 <![CDATA[
3
4 import mx.events.ValidationResultEvent;
5 private var vResult:ValidationResultEvent;
6
7 // Event handler to validate and format input.
8 private function Format():void {
9
10 vResult = numVal.validate();
11
12 if (vResult.type==ValidationResultEvent.VALID) {
13 var temp:Number=Number(priceUK.text);
14 formattedUKPrice.text= ukFormatter.format(temp);
15 }
16
17 else {
18 formattedUKPrice.text="";
19 }
20 }
21 ]]>
22 </mx:Script>


